I’m running Parallels 20 on my Mac Mini M4 with Sequoia 15, and the Windows VM running on Parallels, is the version of Windows 11 downloaded by Parallels as you set up a new Windows VM. With the Windows Product Keys I have access to via my Visual Studio Subscription, it’s a Windows 11 Professional environment.
On Windows 11, I’ve got Visual Studio Professional and SQL Server Management Studio installed, but I haven’t installed an instance of SQL Server onto the VM … I could … but I haven’t. Now for other work I’ve been doing, I’ve got the SQL Server Edge Docker Image running as a Container directly on my Mac, so what I wanted to do was from within my Windows 11 workstation, connect to that SQL Server Edge Docker container. The diagram below shows what I’m trying to achieve.

The challenges with this arrangement is that Parallel’s preferred and recommended networking configuration makes establishing this connectivity difficult – well in fact it just doesn’t work. Docker uses similar approaches to assigning IP addresses to the containers it runs. You can configure the details of the networking for Docker containers with almost endless variation using Docker configuration. This post is only going to concentrate on the Parallels Network configuration end.
Firstly let’s look at the Networking Modes that Parallels Provides. There’s a very comprehensive description of these at the following Parallels Knowledge Base page, so I’ll only be summarising them here:
Network modes in Parallels Desktop for MacMy quick summary of these different networking modes:
- Shared Networking – the default “Out of the Box” setting – For most people this will work fine. Parallels creates a virtual subnet of its own, and your machine belongs to that virtual subnet – behind your Mac’s IP Address. As stated on Parallel’s page on Networking, if your Mac has a VPN enabled, then your VM is protected behind that VPN as well.
- Host Only Networking – similar to Shared Networking, in that Parallels creates a virtual subnet of its own, and machine belongs to that virtual subnet BUT the major differences is that this virtual subnet is isolated from the outside world. Why would you use this? Well, if you had multiple Virtual Machines concurrently running, to test a multiple server / machine application, but this networking mode has limited application, but still none of the concurrently running Virtual Machines have external network access.
- Bridged Networking – This is the interesting option, and the one that allowed my Parallels VM to see the Docker SQL Edge Container. In this mode Parallels creates a virtualised Network Adapter and your VM appears as a separate workstation on the network. Not just a network device “behind” your Mac if you like, but a separate network device which is a “sibling” of your Mac.
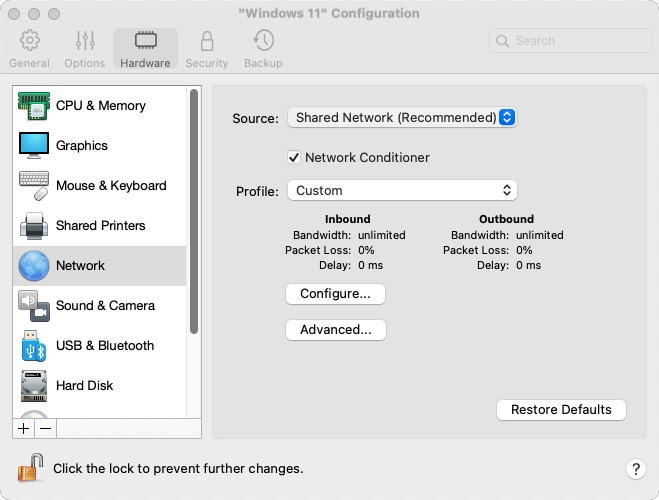
Let’s take a look at this in practice because it takes a little while to get your head around it. When you look at the Network settings for your Parallels Virtual Machine before any changes, the source will be set to Shared Network (Recommended), as shown below:
Setting the Networking source to Bridged Networking is done by selected this drop down list, and selecting the network adapter you wish to create a virtualised network adapter on top of.

I would always choose the Default Adapter, rather than a specific adapter – particularly if you’re working on a MacBook, as the default adapter might change when you’re mobile or docked. Once selected, click on the Advanced button, and you’ll get a glimpse of just how this virtualised adapter works.

This virtual network adapter is provided a “configurable” MAC address – the underlying “hardware” address that every network adapter has. In that way, your Parallels VM appears as a distinct network device on the network, and your router will provide it a unique IP address via DHCP. You could even get your router to reserve a static IP address for this MAC address via a reservation.
And so finally we restart our Windows VM, to see if we can get further now with this new Networking Configuration, having previously had no success connecting to the SQL Server Edge Docker Container.

Success! What are the critical factors to getting connected to our SQL Server Edge Docker Container from within a Parallels Virtual VM? Here’s a quick rundown:
- Make the Parallels networking changes described above – use Bridged Networking.
- When connecting to your SQL Server Edge Docker Container always check the Trust Server Certificate check box, as the certificate presented by the SQL Server instance is not issued by a trusted certificate authority.
- Use SQL Server Authentication as Windows Authentication, and other forms of Integrated Authentication almost certainly won’t work here, without an Active Directory or Azure AD source of Identity to consult. BTW, as you pull and run your SQL Server Edge container, there’s a series of parameters where you set your sa password – choose a better one than the one shown in all of the example versions of the Docker run command! Please!
- And finally, which SQL Server Name do you use? It’s actually the Name of your Mac. As I understand it, this is what happens here. Because the virtualised network adapter gets allocated its IP address by your Router, and your Router is your local DNS Server as well, as long as your host Mac is also obtaining its IP Address from the Router and its name is being appropriately registered in the Router’s list of names, the Router can route your request back to the Mac … and what’s listening on port 1433 on the Mac? The SQL Server Edge Docker Container.
And that’s it. That’s how I got connectivity from my Parallels Windows 11 VM to my SQL Server Edge Docker Container working. Hoping it may prove useful to others.

Leave a comment